In Cerberus FTP Server Enterprise Edition Version 12.0, we have simplified and expanded the way you share files and folders via the HTTP/S web client.
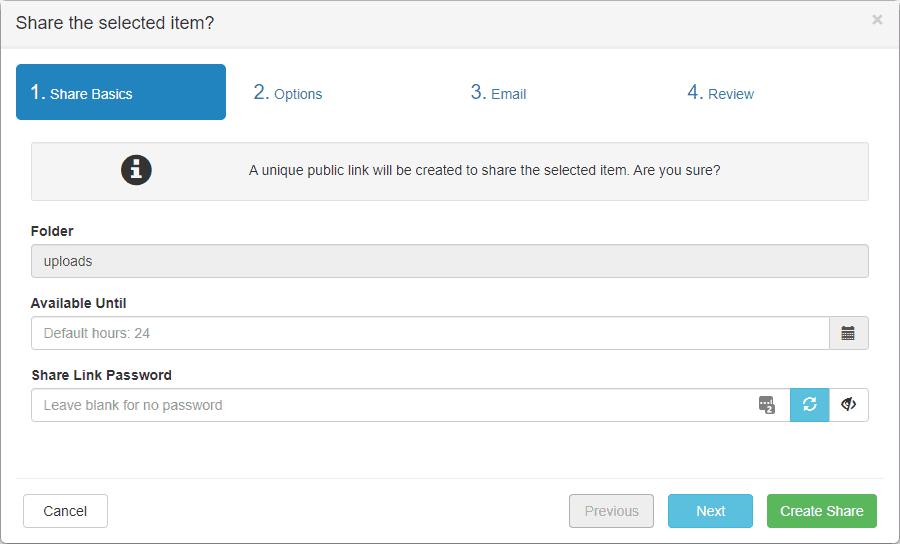
In previous versions, we had separate share and email options; now, these options are unified under one wizard. The wizard consists of a series of steps that depend on your personal settings as well as the organizational settings defined by your Administrator. In the Cerberus FTP Server’s Web Client Share Basics screenshot below, we have selected a folder called uploads and clicked the Share button to display the wizard.

The first panel shows the name of the share and whether it is a File or a Folder. In this case, we’re sharing the folder named uploads. By default, a share will be available for 24 hours, but this can be changed by clicking the calendar icon and selecting a future date/time.
Setting a Password
You may set a password for the share although your Administrator may require a password for all shares. If you prefer, you can generate a password based on your organization’s password rules by clicking the Generate Password button. Manually entered passwords are initially obscured, but can be shown by clicking the View Password button; generated passwords are automatically shown in clear text. The Generate Password and View Password buttons are located to the far right of the password input field as shown in the Share Basics image above (refresh and eye icons respectively).
If your basic workflow is a simple download share, then there is no need to continue through the wizard. You can bypass the rest of the screens now or at any time by clicking the Create Share button. Otherwise, clicking Next will proceed to the next panel as shown below:

The Options Panel
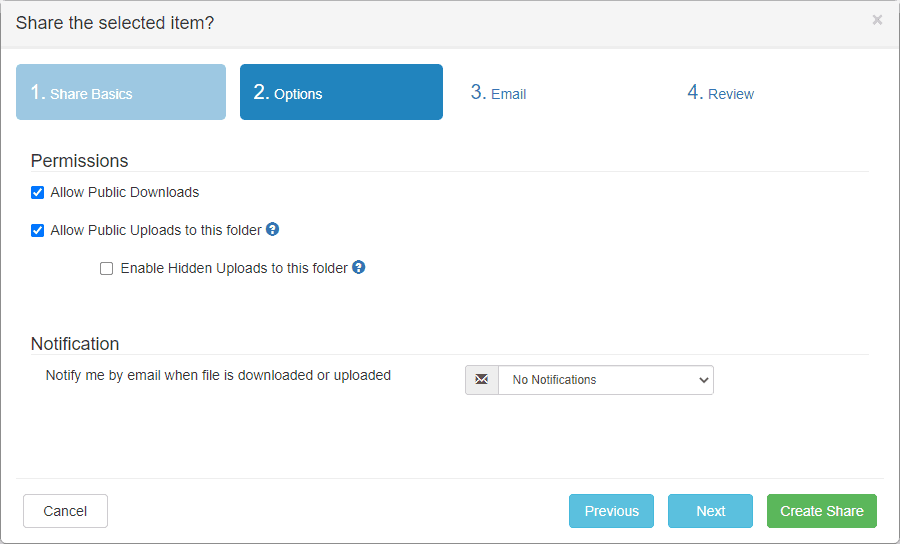
“Allow Public Downloads” allows files or folders to be downloaded; if you are sharing a folder, you can also enable “Allow Public Uploads to this folder” so recipients can send you files.
Hidden Uploads
A new option with 12.0, “Enable Hidden Uploads to this folder”, allows your users to create a special public share link that enables recipients to upload files while not being able to see or download the files that anyone else has uploaded.
Using this option presents a unique, isolated storage folder each time a user accesses a public share link.
The share owner will see a new subfolder created each time a user accesses and uploads files to the public share link.
Created session upload folder names begin with the tag “upload_session”, a timestamp indicating the first time a user uploaded to the share link, and a random string.

Notifications
Finally, you can be notified at your account email address when the share is uploaded or downloaded by selecting an option from the “Notify me by email when file is downloaded or uploaded” select control. Some notification options are controlled by your Administrator and you will only see those that are allowed.
Clicking the Next button takes you to the Email panel as shown below:

Emailing a Public Share Link
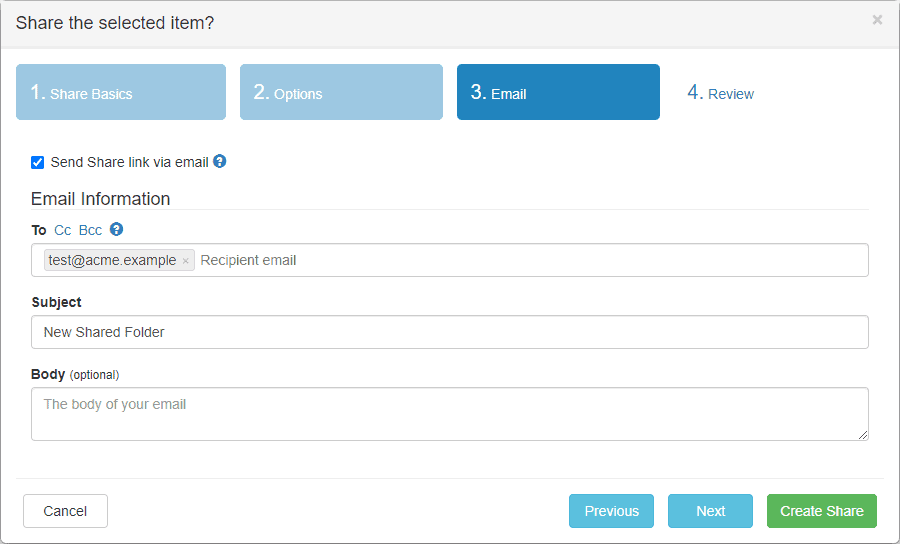
To enable the Email options, you first need to enable “Send Share link via email”, then you can fill-in the details for the email message.
The To and Subject fields are required; Carbon-Copy and Blind Carbon-Copy may be added by clicking on the Cc and Bcc buttons, respectively. The Body field is optional; if provided, it will appear before the standard link information when Cerberus FTP Server sends the email.
When entering email addresses, you can provide individual addresses by hitting tab or enter after each one. You can also provide a comma-separated list followed by tab or enter. Finally, you can simply start typing and a menu will appear offering a list of matches from your personal address book.
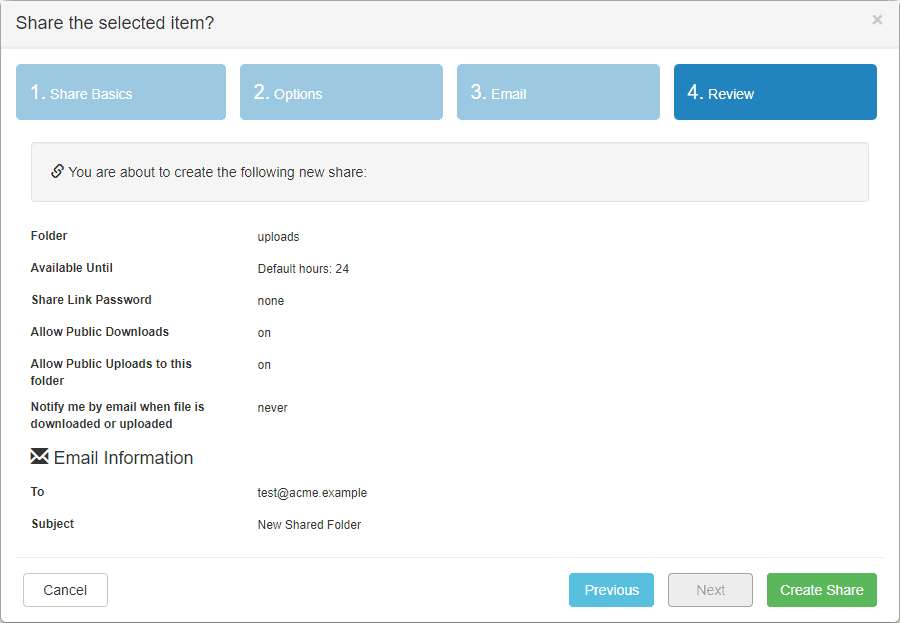
When ready, clicking the Next button will go to the Review panel which shows a summary of all the options you selected.
Finalizing your Public Share

This final panel shows the type of share (File/Folder), the name of the share, how long it will be available, how it will be used, how you would like to be notified about accesses, and any email notifications. You can move between the various panels using the Previous and Next buttons or clicking on any of the panel tabs.
When satisfied, clicking Create Share will create the share, send emails to share recipients, and display the share link below the file/folder in the Web Client. You can also manage the share in the Share window.
Availability
These are just some of the new features that are now available in the web client in Cerberus FTP Server 12.0 Enterprise edition. To learn more about all of the new features in Cerberus FTP Server 12.0, check out our release notes here.